Collecting
your own horsehair can be very satisfying.
Both tail hair and mane hair are used
in horsehair art. Tail hair is used
for braiding and hitching. Mane hair is used
for making tassels and rope.
If you would like to collect your own horsehair for a project that you're
doing or want me to do for you, here are some easy to follow steps.

Tips for Collecting Tail Hair
Tip ( 1 )
Please collect horsehair only from
your own horse or from horses that you've received permission from the
owner. No matter how good your intentions might be, taking horsehair
without permission is stealing. If you can't collect a particular color
that you would like, there are resources listed on the Supplies
page of this web site where you can purchase horsehair.
Tip ( 2 )
Do
not cut hair from a horse that has a very short or thin tail. For example
Appaloosas are notorious for having very thin wispy tails. Only cut hair if you
can get a minimum of 18 to 20 inches on the longest hairs. Anything shorter then
that and it isn�t worthwhile. Your bundles will probably average 24 to 30
inches long. Longer is better.
Tip ( 3 )
If you are cutting hair from several different horses. You might like to keep
track of who is who. I start by
putting different colored hair ties on the bundles as they are cut to keep
track. After the hair is clean, dry and combed out I put a paper tag on the tied
end and write the name of the horse it came from.
Collecting Tail Hair
| Step 1) |
Start
with a tail that has been recently washed and combed. It makes your job
a little easier. If this is not possible that's ok because you can wash the hair later.
|
| Step 2) |
Hold the tail up so that you
can see the underside of the tail. You should be able to clearly see the
tail shaft. It is about 12 to 18 inches long. The hair grows off of the
tail shaft. This is the area that you will be cutting hair from. Cut
from the lower part of the shaft, this is where the hair is the longest.
Always cut from the underside of the tail, close to the tail shaft, this
will make the cuts almost invisible.
|
| Step 3) |
Separate a small amount of hair,
about the width of your finger. Hold the separated hair with one hand. With your
other hand cut the hair close to the tail shaft. (see the picture below)
|
|
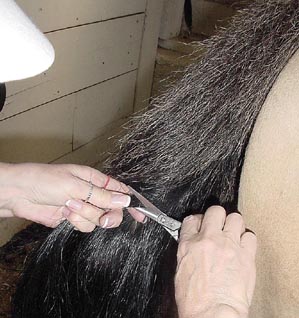 |
Always cut hair from the underside of
the tail. This way you can't visibly tell that any hair was cut. |
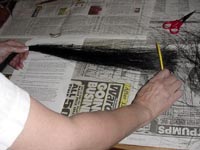
| Step 4) |
While
collecting the clumps of hair lay them down on a clean surface, like a piece of newspaper.
|
| Step 5) |
You should be able to cut 2 or
3 clumps from the same tail without being able to notice that you cut
any hair. Cut randomly from both sides of the tail shaft. (see picture
below)
|
|
 |
|
| This shows a single clump of cut hair. A
single clump is approximately the width of your thumb.
One clump of hair is sufficient for a small project
like a bracelet, key chain or stampede strings.
Two or three clumps would be needed for a larger
project like a hat band, belt or headstall. |
| Step 6) |
Combine
the clumps so that the cut ends are together. Tie them with a rubber
band or hair tie. If
you are sending the hair to me for a project this is as far as you need
to go. I recommend that you loosely roll the hair and place it in a Ziploc
baggie for shipping. To help identify the hair write the horses name on
the ziploc baggie. |
| Step 7) |
Now
you're ready for combing and cleaning the hair bundle.
|
| Step 8) |
Only
the longest hairs are used for braiding and hitching so you will need to
remove some of the shorter hairs. You do this by combing the hair
backwards. I recommend using a wide tooth comb. Lay down newspaper to catch the hair because this can get
messy. Remove the tie and grasp the hair about a third of the way to the
cut end. Comb from your hand to the cut end that had the tie. Comb small
amounts at a time. The shorter hairs will come out in clumps. Slowly
work your hand away from the cut end continuing to comb out the shorter
hair strands until you�ve combed about one half to two thirds of the way through
the bundle. These short hairs are not used for braiding or hitching, so
you can throw them away when you're done combing. |
|

|
| Step 9) |
When
you have gotten rid of the excess short hair, tightly grasp the hair at
the cut end where the tie was and comb through the entire hair bundle in
the other direction.
|
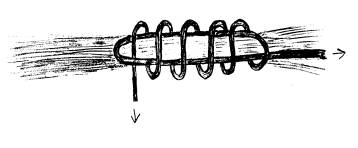
| Step 10) |
Then tie the top of the bundle
with a noose knot as shown below. To make a noose knot cut a piece of cotton string
approximately 12� long. The same kind that is used to wrap newspaper
for recycling or the kind you find in the grocery store used for
cooking. Start your wrap about 2� from the cut end. Lay down a U shape
with the string and then wrap around the hair bundle as shown in the
example. Make approximately 8 to 10 wraps. Lay each of the wraps next to each other
and close together. Don't overlap the wraps. After the last wrap, feed
the end of the string through the U loop to hold the noose knot in
place. Pull both ends of the string to tighten. This type of knot is used so that it can be
tightened as you work with the hair bundle later. |
|
|
|
Start 2� from the cut end of
the hair bundle |
|
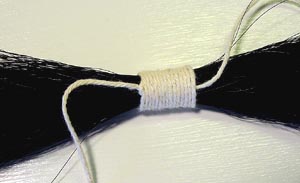 |
It should look something like this when
you're done. This example shows 15 wraps around, but 8 to 10 is plenty. |
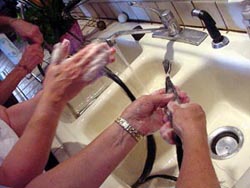
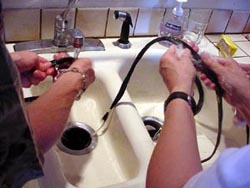
| Step 11) |
Hold
the horsehair bundle at the tied end and gently wash the hair with
shampoo. Then rinse thoroughly with water.
Do not use a conditioner; this will make the horsehair too slick.
|
|
 |
|
 |
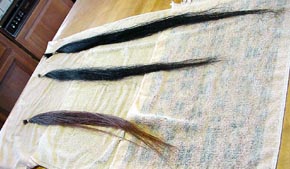
| Step 12) |
Lay the horsehair bundle on a
towel to air dry.
|
|
 |
| Step 13) |
When
the hair is dry, grasp the bundle by the tied end and gently comb
through the hair. |
| Step 14) |
Your
horsehair is now ready to be made into pulls.
|